
Before laser processing material, you will need to load material into the laser system and then auto-focus the laser assembly system onto the top surface of the material.
Be sure to visually inspect the laser cutter bay – you need a clean, flat laser cutter honeycomb bed to allow your material substrate to sit flush against the laser cutter bed. All cutting material needs to be flat across the surface plain and sit flush on the hex bed. Any flex (corner), bowing, cupping or extraneous material jutting upwards can not only modify/change the focal length of the laser resulting in improperly cut/engraved materials it will also impede or obstruct the laser cutter assembly while it is moving and cause serious physical damage to the laser cutter assembly and laser cutter machine.
Leazar Hall Materials Lab – Boss Laser Cutter LS 2430 LED Control Panel
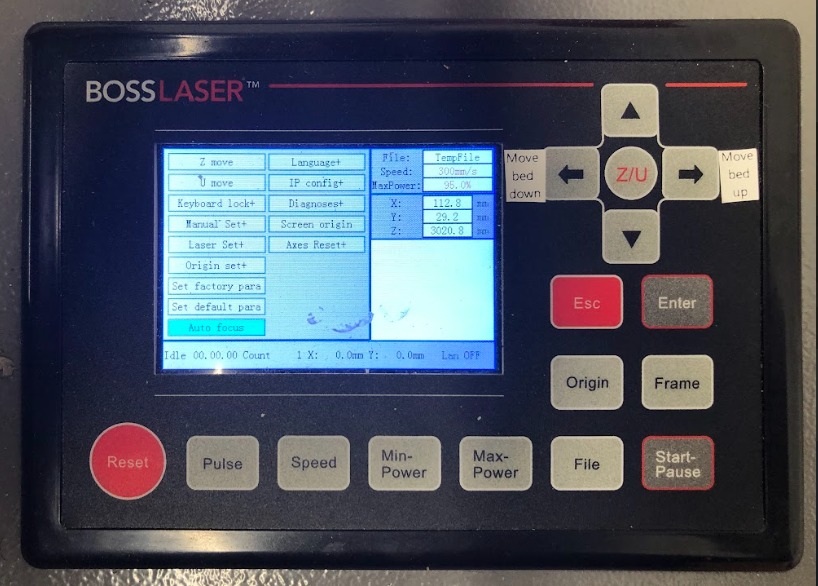
Z/U: AUTO-FOCUS:
Focusing the lens is a very important part of running this laser machine. The machine lens must be focused each time a material with a different thickness is placed on the working table. The laser uses highly focused light energy to its job and the focusing of the lens is necessary, thankfully it is quite easy.
In addition, the wattage of the laser cutters and the type of laser tube assembly used in the laser cutter machine will also change laser cutter focus. The The laser cutters in the Leazar Materials Lab are 155 Watts while the laser cutters in the Lampe Digital Fabrication Studio and MakerSpace are 65 Watts and each have a different laser focus depth.
In the majority of situations Auto-Focus of the laser cutter will be your most direct and easiest procedure to setup and prepare the laser head assembly for cutting.
> WARNING: Always be careful when focusing your lens with thick material, do not allow the material to collide with the lens housing. This can cause SERIOUS DAMAGE to the laser machine.
Auto-Focus:
First, place the material on the working table and press the “Z/U” key on the LED control panel. Be sure that the nozzle is positioned above the material you wish to cut or engrave, not above the bare table.
When your laser head nozzle is above the material, press the “Z/U” key once and then use your up/down arrow keys to navigate the options until the highlight is on “Auto Focus”.
Use the “Enter” key to select it and the Z-axis will automatically travel upwards until your material touches the nozzle of the laser head., it will then lower to the perfect focal point. Your lens is now focused, and your machine is ready to cut or engrave!
> NOTE Do not be alarmed – It will appear like the laser is going to smash into the material, but the assembly is spring-loaded and no damage should occur to the machine.
> WARNING Stay Alert! – Use the emergency shutoff at any time you see the laser head assembly begin pushing down past your material substrate or the honeycomb cutting bed or you hear grinding noises as the laser head assembly is being lowered beyond the lower z-axis boundry. Lowering the laser head assembly beyond the honeycomb cutting bed will damage the laser.
Auto focusing is complete once the table stops moving.
To stop the Auto-Focus routine at any point during execution, press the Escape button.
Manual Focus:
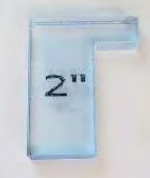
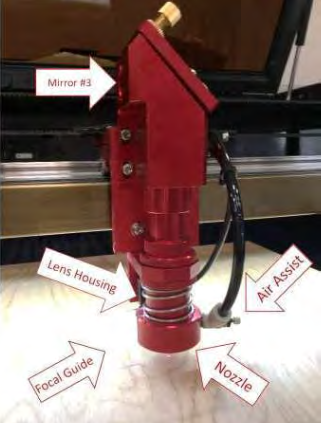
In the event that you want to manually focus the lens, the first step is placing your material on the worktable, next is locating the focal guide, this should be in your toolbox and will look like the image to the side. The focal guide will need to be placed on the ledge of the nozzle as shown in the image. While the focal guide sits on the ledge of the nozzle, use the up and down arrow keys on the control panel to move the Z-axis (the table) up or down. (It is best to hold your focal guide in place while you move the table). Once the material meets the focal guide, your lens is now focused!
LEAZAR HALL – Boss Laser Cutter – Z/U AutoFocus Top View
> NOTE Do not be alarmed – It will appear like the laser is going to smash into the material, but the assembly is spring-loaded and no damage should occur to the machine.
> WARNING Stay Alert! – Use the emergency shutoff at any time you see the laser head assembly begin pushing down past your material substrate or the honeycomb cutting bed or you hear grinding noises as the laser head assembly is being lowered beyond the lower z-axis boundry. Lowering the laser head assembly beyond the honeycomb cutting bed will damage the laser.
LAMPE HALL – Boss Laser Cutter – Z/U AutoFocus Top View
> NOTE Do not be alarmed – It will appear like the laser is going to smash into the material, but the assembly is spring-loaded and no damage should occur to the machine.
> WARNING Stay Alert! – Use the emergency shutoff at any time you see the laser head assembly begin pushing down past your material substrate or the honeycomb cutting bed or you hear grinding noises as the laser head assembly is being lowered beyond the lower z-axis boundry. Lowering the laser head assembly beyond the honeycomb cutting bed will damage the laser.
Boss Laser Cutter – Z/U AutoFocus FRONT View
Laser Cutters
- Laser Cutter – Post Processing, Cut Parts & Pieces
- Laser Cutter – BOSS Specifications & Overview
- Laser Cutter – SawStop Warning
- Laser Cutter – Material Substrate Sizes
- Laser Cutter – Personal Protective Equipment (PPE)
- Laser Cutter – Boss CO2 Laser Safety
- Laser Cutter – Basic Safety Overview
- Laser Cutter Schedule – Lampe Hall
- Laser Cutter Schedule – Brooks Hall
- Lampe Maker Space
- Laser Cutter Information
- Laser Cutter Certification Sign-up
- Laser Cutter – User Guide
- Laser Cutter – Recommended Settings

